
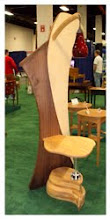
Furniture design can take the form of many different shapes. In episode four of our Carlo Mollino inspired coffee table, we find....our...shape.
From a picture to full scale drawering, to the construction of our bending form, you'll see our bending ply take a shape Carlo Mollino would be proud of. One of Birds-eye maple the other of Plum Pudding Mahogany.
Enjoy and let me know what you think!!!!
Carlo would.
Formats available: Quicktime (.mov)


19 comments:
I recently stumbled upon your site and took the time to review all your past episodes. I've been waiting all week to see how your glue up was going to happen, great job!
I take my hat off to your wonderful helper/camera person, the Great Gigi! If I was attempting the same thing, the video would have shown my wife leaving the shop, then a close up of me laying on my back with a mallet next to my head!
I was wondering how you were going to do the layered glueup. I didn't realize it was going to be done in one swoop! Very impressive, Neil. Another great description and demonstration. This is a terrific series!
Neil -
Always a great day when you post a new episode! Excellent work. The curves look awesome. A quick question about the vacuum breather mesh. Do you only need to use it on one side of the press? I assume the best position is on the vacuum nipple side. Thumbs up to Gigi getting out from behind the camera! Very cool when she said "that was stessful"! Your video quality is awesome and the voiceovers are great. Looking forwrd to the next episode.
Nice bend Neil, The form worked great.
I've been checking in daily to see the results and Bingo! There it was. Great video, and very informative. I'm anxious to learn what your final decision will be on attaching the glass.
Neil, I’m jealous. It bothers me deeply that I can’t run my own little hands over exploring every curve of that Carlo inspired table the way you do. ;)
Seriously, it was nerve wracking watching you and your wife labor over that form. Ouch...our little demon voice inside called perfectionism, can deliver a sharp poke.
Approximately how long did the glue-up till complete clamping take you?
Fantastic!!!!
-Ace-
Neil,
Very impressive operation on the glue up. You and Gigi are a team! For all that you did there (along with shooting the video of it) I am amazed how calm you stayed. It's obvious that you've been down that road before.
Oh, thanks for the reminder to "leave well enough alone" - we as woodworkers do always seem to think that we can do things one step better, don't we? For me it's usually during the finishing process...the next thing you know I am applying one more coat because my last little tweak didn't look so good!
--Mark
I've been watching this series with great interest. Sure is nice to see the laminations come out of the bag. You're right, we should always strive to push ourselves. Is that a polyurethane or vinyl bag? I Imagine a poly bag would put up with the abuse better.
Appreciate all the comments...Thank you all!!!
Len....welcome aboard!!
Tom .....Gigi laughed at your comment, but I know where you're coming from, I keep mallets out of arms reach and have a hard shell under my surgical cap. I'll deal with the occasional back-eye :).
David......only need the mesh on the nipple side and over the work. If you are bending over a form inside the bag, the mesh isn't needed as the flat platen (you already have)serves to evacuate.
John......made contact with a company in NV and as far as attaching the glass to the top radii, we're covered with a bit of scultping. The stand-offs are threaded through so attaching from below, inside the radii will work. Attaching the lower shelf with "glass grippers" still needs some thought then follow-up questions. We'll get what the company offers to work, the key will be preventing the lower grippers from being dominate. Hey that's half the fun. Looks like I'm going to have to dig deep into my cabinets and pull out my forgot riffler rasps. For me this is why I like this blog....its bringing me back to my tools and hopefully all of us forward including me.
Ace.......how's the golf game??? Just looked at the time code on the video and its approximately 29 minutes from pouring the glue into the paint tray. The key to expediting, was only rolling glue onto both sides of the 1/8 inch bending poplar. Although I cleaned out the grooves we made, the last issue I wanted to deal with was picking up wood-chip-trash rolling over the grooves, but I did give a quick roll behind the grooves on the 3/8 bending ply. It was more peace of mind, feeling the the glue would add a bit of moisture and flex better. Who knows, but it made me feel better.
Mark.....good line....having to add one more coat because the last little tweak just wasn't good enough. Although the last table you posted looked..."perfect".
Mike........that's a vinyl bag and you are absolutely correct a poly bag would take the abuse better. Normal use for me with that bag has been large arcs done in the manner to an outside form. Glad to see your comment on pushing....my intent is not to say pushing is to construct a compound curve, but to push the thought process, to visualize the design, to work through the construction, and most importantly to say "I can do that". I'm a big believer that better work should be coming out of our shops.
Again thank you all......Neil
Hey Neil. Killer episode. I really enjoyed it. That bent shape is CRAZY and you pulled it off! Way to go. By the way, I made mention of your show over at my site. Go check it out homie.
Marc
The golf game has deteriorated, elbow troubles, ya know the Ace is in his mid 40’s. Getting out of bed, I feel like a rusty gate.
Post if you could, is there anything you can do should you trap a wood chip beneath the surface. A fix or repair?
-Ace-
I have been duly impressed today! I decided to get into veneering after a very short class at AWFS with Paul Schurch. I hope to visit often to learn new methods and to "push" myself. Keep up the tutoring. Can I use this in my woodworking classroom?
Great bends! I just came over from the woodwhisperer. Looks like he found another winner. I will be checking out more of your videos!
Very interesting episode, makes me want to try some bending myself.
Interesting to see that your form looks a bit like the side bending forms that guitar makers use:
http://bluescreekguitars.com/tutorial10.php
I am a new veiwer and think I'm hooked for life. Your Mollino interpretation is inspiring. I am not sure what "wiggle wood is or where to get it. I will shop around on the net.
Thank you for the really fantastic pod cast and please continue.
Hey Ace.....tough call, not like a little air bubble we can slice and inject adhesive into, if a chip gets caught between the 2 ply and the 1/8" bending poplar....BUMMER. Remember that Unibond 800 is going to cure that "bump" to the substrate. In the design of the case, maybe you'll be lucky and the chip ends up in an area that gets cut out..(lets leave out Murphy here), if it rears its ugly bump on the underside, it could be unobtrusive, if it's present in the face, we could decide that: 1. move to a satin finish for instance that will not reflect the blemish as a gloss would, 2. Cut it cut-out and inlay a masterful sailing marquetry scene, or inaly just a suttle fix. 3. Lastly, we 've got to remember that we are not using working plans here, this piece is a creation in process, we know the final form but how we get there is in our hands. If that chip shows up near an edge, we can cover up the blemich with solid wood trim that works with our form.
Ace.........where there's a will there's away......I didn't just come up with that did I????
For those who watch on iTunes, I think you raise an excellent point here, so I'll make sure to mention this in the next episode.
I see I need to show the wiggle wood up close etc........so we'll hit everybody....at the saw.
Neil,
Another excellent show and I'm glad the audio sync issues got taken care of. I hated seeing your masterful work rendered to B-movie status because of a technical hiccup. 8-) Now, I noticed another gap near the end where you were talking about what goes in the house, but I'm pretty certain you were just exercising a CYA move there.... I wish I could read lips better.
A suggestion -- you might want to look into the plastic, stretchy wrap that movers and warehouse guys use. Basically, it's a thin film of plastic that has some degree of stretch to it. After a few layers of it being wrapped around things lock down nice and tight. UHual carries it if you can't find another source for it.
Here's my kudos for calling out another lesson in patience! We have to remember to enjoy the process, not just the end result. Or at least *I* need to remember that.
Out of curiosity, does each table have to be custom trimmed? I would imagine so given the variability in how things could shift around while being placed in the form.
And my last thought is that I would have loved to see an overhead cam shot of you & Gigi putting the layers together. Having that view running at double or triple time would have been informative and pretty fun to see. I noticed there was (almost) no audio from that section -- do you and Gigi have a rule of "what's said in the shop during veneering stays in the shop?"
Neil:
I am new to your site via The Woodwhisperer, thanks to Marc. Great work, keep it up. I learn something from each of your episodes.
Anyway you said you would be putting epoxy into your "kerfs" for added strength. I have a suggestion that might make that easier. My dad used to hang wallpaper and to fill bubbles, if he had any in his work, he would use a syringe with a large bore needle. First he used the syringe to get the air out and then he used it to put glue in. I don't know if this would work with epoxy given its viscosity, but I thought I would offer it up.
Dan fro UT.
Neil, I loved this episode! I had to laugh at what you said regarding what goes in the house. I haven't finished my shop yet, but I've been sketching the pieces my wife, Sylvia, wants me to build. I already have some that aren't coming inside! You've given me some ideas on how I can make some of my drawings come to life. Thanks for sharing your knowledge and passion.
discriptive, informative, inspiring.
can`t wait for the next instalment.
keep up the good work.
Post a Comment